The idea was to pose the tote on the green background of the sofa, but as soon as Charlotte saw sofa activity, she took the spot where the tote would have sat. Thus, the tote was placed on Charlotte, and she heaved a withering sigh, but was cooperative.

The fabric is none other than Ikea fabric! They sell by the yard, this one was $5.99 per yard. Nice bold colors on canvas like fabrics, good for screen printing and making bags. I tried making a slightly nicer than usual tote, with a pocket on the inside, substantial handles, and a lining around the rim of the bag to help keep its rectangle shape. This prototype took about, oh, 2.5 hours to make. Now I have a better idea of fabric piece sizes and how to sew it up more efficiently.

I didn't intend for this to be Halloweeny, but it turned out to be Halloweeny colors. Well, it's the right time of year.


My co-craft fair crafter is always making bags for other people. I learned of her recent birthday after the fact, and thought that she should receive a bag for a change! As I am in an applique phase, I made an applique bag. The screen print is one I made earlier, and I dug around in my closet for old t-shirts that I don't wear but couldn't bear to throw out because I liked the fabric too much. This dotty knit fabric had a prior life as a camisole, purchased at least 6 years ago, but now it lives on as a octopi screen print background, machine-sewed on to a organic cotton tote. The camisole was pretty small, enough fabric for only 2 printings, thus only 2 of these totes will exist in the world. I'm keeping the other one :)

See my co-craft fair crafter's crafts at:
http://charinacharina.googlepages.com/

This has been one of my more troublesome prints, probably because it's the largest I've attempted so far. It's about 16" long and 10" wide, which means there's a large surface area over which to maintain even pressure when running over it with ink and a squeegee. There's also more area over which a screen could be accidentally nudged in between ink runs, thus blurring the design.

I originally printed directly on the blue t-shirt, messed up and washed the ink out as best I could. A shadow remained, so rather than reprint over the shadow, I found an old too-small taupe t-shirt and printed the design in blue on that, cut it out, and sewed it (ie. appliqued) onto the blue t-shirt, covering the shadow.

I was immediately fond of the result. And I suddenly have a use for the old t-shirts that I don't wear but have been too lazy to donate!

Happy Birthday to my blog! I've blogged for a full year.

I've been trying to pull out another screen printing idea. My brain is so cluttered with other stuff at the moment, that it is hard to think creatively. I kept thinking of cliche designs, like swimming koi. While I am fond of koi, I also like the style in which koi are composed and presented. Think full back Japanese tattoos. Fish, gracefully posed, complemented by stylized splashes of water, undulating lines indicating water movement, a sprinkle of flower blossoms... But, so uncreative to feature koi! It's been done a million times.

One of my unofficial screen printing goals is to include local animals in a design. I've not personally experienced that many local animals in the wild, but of the few that I have include leopard sharks, guitar fish and round rays, whose mating territory I invaded when I snorkeled amongst them a few summers ago. OK so I didn't really see a sea urchin, but I do know some sea urchins are sand dwellers, as I have drawn them for Birch classes that have to do with sandy lifestyles.

The stylized waves are far too curly, harkening back to an old European decorative aesthetic as opposed to an Asian one, so I will change that. But you get the idea.


There is something endearing about multi-legged creatures. I'd fancied doing an octopus screen print, but wasn't inspired until recently. A lot of my animal subject drawings feature animals doing normal, biologically accurate activities. So in this case, I decided to leave that comfort zone and go with something more artsy. I also tried to draw the Idea of octopi, rather than to represent octopi in a relatively realistic manner. What is the essence of an octopus? A large, bulbous head, long tentacle-y legs. So I left it simply at that, instead of including suckers, breathing apparatus, etc.

I knew the main octopus should be a solid color, and selected a few smaller ones also to be solid, based on composition. I wanted the viewer to be drawn towards the large octopus. The selective coloring does this, but also the octopus positioning; they are all swimming towards the central guy. This pulls the composition together, even though there are many separate individuals.

I'd had this screen print for a few days, but didn't find anything to print on until I perused the Target clearance rack. This Jovovich-Hawk (guest designers for the GO Line) scoop neck dotty T was perfect for a green octopus print... I knew it when I saw it on the rack. And luck for me, it was the only one, and in my size.


I screen printed the penguins onto some gray felt which had been sitting unused in my fabric pile for about 5 years (sewers, as in sewing people, will understand this fabric hoarding behavior), and whipped up a small 8" x 10.5" bag. It's lined to keep the felt from stretching (using a periwinkle blue lining fabric, also from my pile), but no pockets other than the main one. I noticed while shopping today, that the bag sagged funny, so I added a snap to the middle, which helped the bag keep its rectangular shape. Not the neatest job, but it's functional.

It takes at least 3 runs of the screen printing squeegee to get a good, dense amount of ink on felt. Otherwise felt is lovely to print on; no bleeding, very crisp edges. I broke a sewing machine needle trying to sew the handles on because I was forcing the needle through too many layers of fabric, but then switched to a needle intended for thick material and all was good. Pockets are a pain, especially ones with zips. I was too eager to have a new bag to bother with pockets, but perhaps in future designs.


Penguins are In right now, and for good reason! They're very cute. So naturally I wanted to make a penguin screen print, but there are so many penguin designs out there featuring upright, waddling penguins. Thus I thought, why not a design showing penguins at their gracefulest, in the water when they are in their element?

These diving penguins are based on the chinstrap penguin, a resident of Antarctica. I picked them for their markings... I wanted a face that wasn't completely dark. I drew this out in pencil first, but wound up cutting out the individual penguins and rearranging them for a more interesting composition. The solid color of penguin backs made for a nice print.


Sunday was t-shirt screen printing workshop day. I set up 3 tables to form a long work bench in the living room, and the bathroom and kitchen were transformed into print areas. The chandelier and curtain rod served as drying racks. 8 friends gathered to learn the basics of screen printing.

There are physical and mental challenges. The mental ones include getting one's mind wrapped around the idea of positive and negative space, and using various liquids to fill one or the other. The tricky physical part is applying even pressure to the squeegee combined with a balance of lateral and downward pressure when forcing ink through the screen.

Everyone learned quickly; before long, there was a flurry of activity as screens were peeled off t-shirts and t-shirts were triumphantly hung to dry.


Today I hosted the 4th annual edition of GITDU (Glow In The Dark Ultimate). It doesn't take terribly much organization; just the purchasing of bulk glowing bracelet accessories, finding a field that will be suitably dark, and the recruiting of a good bunch of ultimate friends. I also offered to screen print T-shirts with light blue glow-in-the-dark ink. Here's one of them:


This is the resulting screen printed T-shirt. It is always hard to part with my artwork, but parting with printed pieces is easier (I can print another one!) Also, I'd promised my friends cool screen-printed items in thanks for dog-sitting my dog. The design is actually based on an old drawing I made about 10 years ago.

How to screen print a t-shirt


Materials:
Screen (I like Blick 12XX pre-stretched frames)
Cheapo Paint Brush
Drawing Fluid (I use Speedball)
Screen Filler (Speedball again)
Screen Printing Tape (water resistant tape)
Rubber squeegee (at least as long as design width)
Small Spatula and/or Plastic Spoon
Large Sink or Bathtub
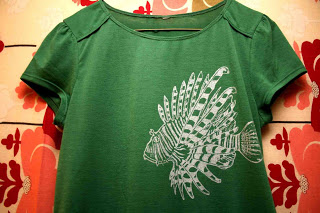
Pre-washed t-shirt, dried without dryer sheet (start with undesirable practice T, though)
Fabric Screen Printing Ink (Speedball)
**Supplies purchasable from online art stores like dickblick.com.**

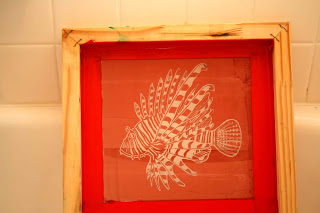
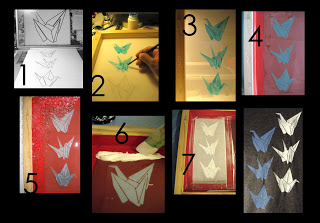
1. Think of a design. Print/ draw it out, and figure out what parts will comprise the negative and positive spaces.

2. Place screen over design, but elevate it so that it is a 1/8 inch or so above your design (prop screen up on chopsticks, perhaps). Using cheap paintbrush, use Drawing Fluid (DF) to fill in POSITIVE SPACE.

3. Let it dry. Make sure it's completely dry before next step. Use hairdryer if impatient.

4. Tape edges of screen to form a tape frame around design. Prop up screen slightly (e.g. one end lifted up by toothpaste box on side). Shake Screen Filler (SF) and pour out a strip of SF along the top of the design (it's viscous enough that it won't run downhill).Using a firm grip on the squeegee, spread SF down over design, covering all area within tape. Do one more swoop upwards. No more than 2 swoops or the DF will start dissolving prematurely. Wash/dry squeegee.

5. Allow to dry completely. Then rinse: DF will dissolve away, leaving water insoluble SF to block out negative space, like a stencil! Neaten if necessary; dab SF on missed spots. It's hard to remove dried SF... I use a pin tip and run it gently against the screen. Dried SF will flake off in tiny bits (Very tedious; not for uncovering large areas).

6. You're ready to print. Place scrap paper/magazine page inside t-shirt to prevent ink from staining other side of T. Place screen on T, on sturdy horizontal surface. Use spatula/spoon to dollop ink in a strip across top of design. Be generous - you can salvage excess ink later.

7. Use one hand to hold screen down in place, use other hand to firmly swoop squeegee down screen so the ink spread over the design. Reverse pass, then repeat. I'd say 3-4 swoops total (up, down, up, down) is enough, but it depends on the fabric; some take ink faster). Peel off screen slowly. If you are ink-miserly like me, use spatula to scrape excess ink from screen & squeegee and put back in ink container. Immediately rinse screen, squeegee and spatula thoroughly. Do NOT let ink dry on your screen.

Allow first print to dry before printing again on same T. Make sure screen is dry when re-using. When design is complete and dry, iron inside out for around 2 minutes to set ink.


I finally got around to trying out my new silk screen design. I had intended to photograph the stages of screen-making, but I forgot. Fortunately, I have more screens planned. No special technology is needed for screen printing. It's all about blocking out negative space; creating a stencil on a screen. The mesh is there to even out the ink distribution.

At first I considered black ink on green. I dabbed some black ink on the inside of the T-shirt and thought the contrast was a bit too subtle for all the detail I'd put into the screen. Why not silver and green? An unusual combination... I think it works. When it dries I'm slapping another lion fish on the back of the T-shirt.