Union Jack Swaddle

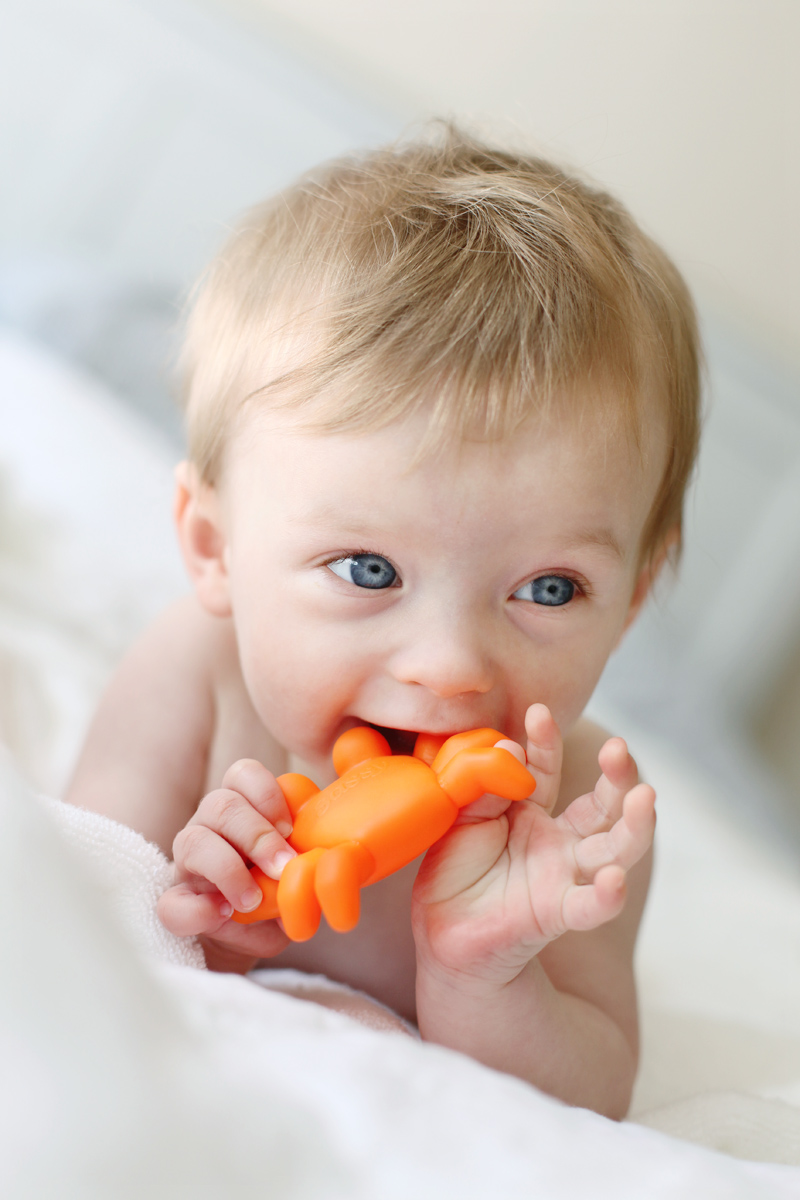
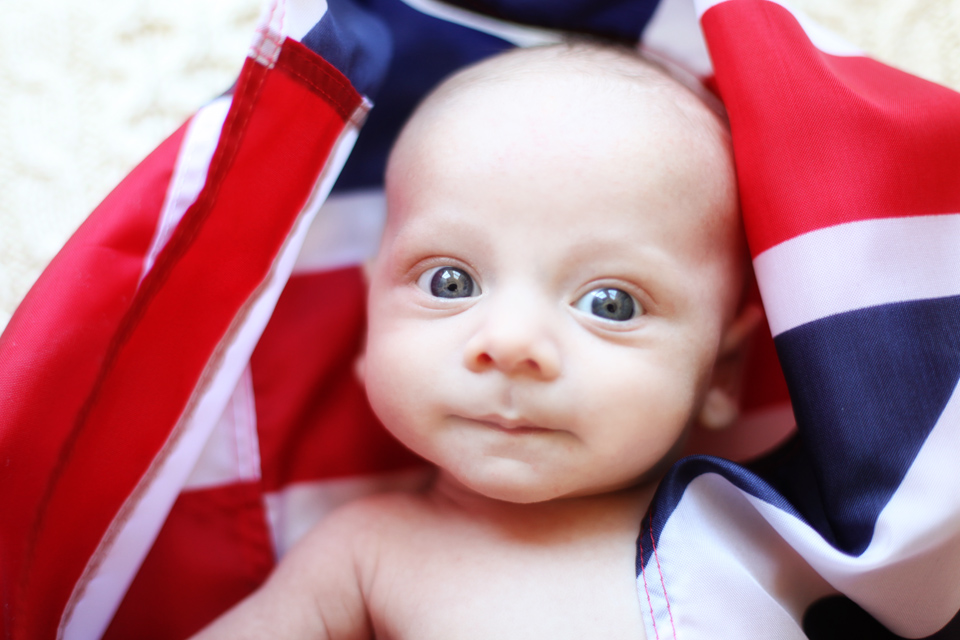
He's a half English baby of course! Some babies love to look right into the camera, which is fantastic or me. A big black lens in stark contrast with surroundings is intriguing perhaps. The eyes make all the difference in a baby portrait. Especially with the window reflection catch lights, soft cloudy day lighting and really really cute baby, I couldn't be more pleased with this set of close ups.

When it comes to babies with floppy necks, often the easiest photo position is to lay them on their back. I realize I like to distract the viewer from the fact that the baby is just lying there, and I do this by draping fabric around them.  This also reduces the big distracting shadow that would otherwise be created by their head on the background surface.


Today, I received a request to photograph a kid's birthday party in 2 weeks. My brain said Haha!! - hauling my now full term body + two more weeks of weight gain + camera equipment around a kid's party would be physically entirely impossible, or I may even have a baby by then. I have put a notice on my website that I am on maternity leave, but perhaps I should say so in my voice mail as well. This is where a separate business email account would also be useful, for insta-reply maternity leave notification. As for return from mat leave, I'm guessing mid-July-ish, on a limited basis. However, I've no idea of what life will be like, so plans may change. Having said that, I do already have a list of fifteen-ish families who are in line for a summer shoot, as soon as I am ready. And Fall is Insane Photo Season. I'm going to put off thinking about that for now. BTW - notice how Fall 2010 Insane Photo Season overlapped with second trimester? Yes, it was all a part of the grand plan! Devious Laughter!

I didn't plan on continuing to work (be it editing at home or shooting) this far into pregnancy. What I didn't factor into my plans was the huge reduction in efficiency that I would experience in third trimester as a result of being large and slow and achy and prone to napping. Dog walks take twice as long, putting on socks takes ten times as long (it doesn't help that I prefer knee socks), and many many minutes of my day are spent getting up to waddle to the bathroom and back - every 45 mins. So while I did decrease number of shoots in the last 2 months, my functional hours per day have also drastically diminished - resulting in Time Passing Fast as I remain busy!

I Miss Mobility


These were taken way back in November, back when I was... sigh... mobile. I do miss being mobile. Botanical gardens make for wonderful photo shoot locales! Not only because of the variety of flora, but also there is flora of varying heights, filling in the background at all levels. This evens out the lighting - camera does not get confused by bright back lit spots. However, all the shade means hunting around for the ideally lit spots, and placing my subjects to be optimally lit. Recognizing optimal lighting for any given weather/ location is one of the hardest things to learn.


I did my last pre-baby shoot on Thursday - I had a weak moment and made an exception to that one last - for reals this time - request as she was a repeat client with a 3-week old. It's become really difficult, well, painful to hold a camera, even with a small sized lens - how sad is that?! Due to weak wrists and swollen cabbage patch kid hands and sausage fingers. I drop stuff frequently and then have to deal with how to retrieve the object from the floor. Often it's not worth the effort of trying to bend or squat, and thus the area around my desk is littered with pens, receipts, note paper. I'm told the swelling-related pregnancy symptoms relieve themselves very soon after birth, so I am looking forward to that. Currently I feel like Michelin Woman waddling down the street, or maybe a large gourd.

There are few fun aspects to late third trimester, but one perk is that I am a product tester for new maternity products at Ingrid & Isabel, a SF based maternity wear company (they make the Bella Band, for those of you who have contended with pregnant bellies before). Today I am going in to be a "fit model" - I guess that means they'll measure me and have me try on stuff to see how a future line will work on a very short, very pregnant woman with fat hands.
Oh dear, my hands do not seem to be fitting through the sleeves.

Quilt Update, A Brief History of (My) Sewing and Revisiting the Giant Tree Hopper


Here's how my quilt is coming along. I believe I last left you with a whole bunch of cut out squares. I additionally cut out measured rectangles of elephant fabric, and then sewed columns of fabric together to form 9 long strips (5 of which were long gray only rectangles, and the other 4 comprised of diff fabrics). I pinned strips together before sewing to make sure rectangles were parallel - I've just pinned on a gray strip above, and will sew along my fabric pencil line leaving about 1cm of seam.
The underside. In those strips comprised of different fabrics, note that I iron-opened the seams flat before sewing strips together. This prevents having to sew over more layers of fabric than necessary (2 layers thick at most, instead of 3), reducing lumpiness and sewing machine unhappiness. I am trying to be very neat in this project, as opposed to the Laissez-Faire attitude I usually have towards sewing.

I credit 2 sources for my sewing know-how. First my Mom (thanks Mom!) who has sewn stuff up for me from Japanese stuffed animal kits to a high school formal forest-green velvet dress. She had me machine sewing easy stuff from a wee age - following old school tissue paper patterns as well as improvising our own; and blind-stitch hand-hemming - which is incredibly useful for a short person like myself. Second, in Home Economics class, (British, Hong Kong) middle school - boys and girls learned to machine sew and dye stuff.

Since then, I've partaken in a plethora of sewing experiments of my own, such as clothes (I quickly learned that it is much easier and funner to shop for clothes), animal-themed costumes for museums/Halloween, and art projects such as the Tree Hopper (circa 2004) below, which you may have seen before.

Tree Hopper is approx 4' x 4' x 8', sewn on an ancient Singer with 2 stitches - straight and zigzag, and made of hand-dyed and airbrushed cotton canvas, industrial yellow vinyl, cotton cord for wing veins and internal plastic tubing for structure. Can I say, it was a pain in the butt to stuff this thing under the sewing machine arm.  It only worked out because I had the distraction of Harry Potter Audio Books to keep me going - that plus Michigan snow kept me indoors. Anyways, minus all the stuffing, which I donated to the UMichigan Art Dept for re-use, Tree Hopper now fits nicely in a large box in our pantry. It was way too much work to just toss, but what does one do with a deflated giant Tree Hopper carcass?

Baby Tigers, Baby Rabbits


They are observing their father, who is free style beat boxing behind me -in one of the most energetic and creative efforts to entertain babies at a photo shoot that I have ever aurally experienced. This was a great shoot to finish up my shoot season - incredibly cute twins at my favorite photo shoot age (between 6 and 9 months; sitting up, push ups, giggly, full on baby pudge - and no escape crawling!); ideal window lighting and large plain bed surface and wall to work with; fun but not overwhelming props; enthused parents; a resulting great batch of photos.

Wait Wait Wait, Back Up, Finish Up Shoot Season? What is this all about? you ask. Well, I'm headed on maternity leave. I didn't mention it? Yeah, I did hold off on that, had I not - I'd be tempted to blog, All The Time, about how tough it is to do photo shoots while lugging 10, 15, 20, 25, now almost 30 Extra Pounds around. Figured it wouldn't be that interesting to read about my grumbles. Waiting until now, I can apply hindsight, and write more thoughtfully about the experience. Mobility/ Physical Challenges are the obvious issues, which I'll talk (A Lot) about later. There are much more positive things that have come out of this.

What was most enjoyable about being a pregnant photographer is the immediate camaraderie that I formed with my mom clients - that's basically, 99% of my clients. As so many of my subjects are babies, many moms were recently pregnant, and offer much empathy and advice. In several cases, repeat clients are pregnant with their second baby, and the news of more babies to come are a delight to both of us. It is fascinating how just the shared experience of pregnancy has made my already fun job as a baby photographer even more satisfying - before, I was an observer and documenter of the mom world, but now I am also a participant, and contributing community member.

I am on partial maternity leave, which means I am done with shoots - much to my back's relief. I still have piles (as always!) of edits to work on, which will keep me busy, and my blog filled, for the next few weeks. I should be on full Mat Leave by April, and then will be photo free - haha, except for pics of my OWN baby - until July or later. There might be some other baby photos sprinkled in there. 'Tis the season for baby births it seems, and I suspect I will not be able to resist taking some pics of other Baby Rabbits for good friends. Unless I am That sleep deprived. I'm planning to keep Octopus Ink blogging with curated The Best Of photos and tidbits of photo-taking wisdom; I will display less stringently curated, gushy Look At My Baby on ABC day doing XYZ type pics elsewhere.
So stick around.

Keep on Runnin'


I tend to go for the facial closeups, but I've been trying in include more Kid in Environment type photos in my shoots, for more style variety. With complicated backgrounds, it works best when the kid is far in front - at least 10 yards - of the nearest background elements (the row of trees in this case), so that I can bokeh-out (unfocus) the background using low f/number, like 2.8. He really pops out of the foreground and the branchy branches are not distracting. Lovely sunset light doesn't hurt either.

Everyone Can Tie Dye, You Can Too

Spend some time deeply contemplating your tie dye design. Take pre-washed, damp 100% cotton fabric. Try twisting, scrunching or accordioning the fabric, or go for the classic bulls eye pattern. Fasten tight with rubber bands.

Some tighter, some looser - this will vary the dye seepage. Very tight ties of course, will prevent dye access entirely, leaving undyed white areas. Put all tied fabric items into warm soda ash water solution (as provided by the handy Jaquard Tie Dye Kit, purchasable on Amazon) to soak for 20 mins.

Glove up! Or you will have dyed hands. If you can't get gloves on by yourself, don't be shy: ask for help. Wear stainable clothes. Fish out soaked fabric items, squeeze out excess liquid, and put everything on a plastic-covered work surface.

The Jaquard dyes come in convenient squeezy bottles. Apply dyes to fabric, like you would generously apply ketchup to a hotdog. Place in ziplock bags for dye to bond over 12-24 hours. Remove from bags, rinse in warm water, snip rubber bands, wash with soap, and dry. And voila! I have some 30 tie dyed cotton flannel squares, ripe for quilting.

Little Lady Bug Lady


Three year old birthday party with Face Painting! There's no way to refuse. I was so there.
Needed a muted pop of flash for these back lit outdoor pics - the faces were in strong shadow.

I have to admit. Little girl Party Outfits are more fun to photograph than Little Boy Party Outfits. I suppose it's like grown up outfits - there seem to be an endless choice of women's dresses for special events, and relatively little choice for men's outfits. Girl's dresses come in a rainbow of colors - not just pink - I've certainly seen fabulous girl dresses in all shades of gray, navy, brown and green as well as the usual "girl" colors. But boys outfits seem rather limited to the lego/ ikea/ play doh palette, ie, primary and secondary colors. And light blue. Not really fair, is it?

Window Pane Quilt In Progress Part 1


I want to work on disciplined quilting. My recent quilts, the ones with curvy design were practice in non-straight edges, but does allow for a bit of sloppiness in terms of fitting pieces together. The Window Pane quilt, not an original design of my own at all, is a traditional pattern, very geometrical. It will be very easy to see if the pieces were not measured/ cut/ sewn accurately.

The original point of quilting (I assume) was to use up little scraps of fabric to form a big blankety item, when large fabric pieces were scarce. So there was no luxury of large, curving pieces - instead, one could gather lots of little squares, rectangles and triangles. While I do have large bolts of fabric, this is a nod to the days of fabric scraps. BTW, this is a continuing story; if I wait until the quilt is done, I will have forgotten the details of How To and Progress.

1. Drafting Design. I'd seen the window pane quilt around before, but didn't have a pattern, so I drew one out, and applied dimensions to the squares etc so that it would wind up to be baby blanket size. Note that this design is NOT simply a bunch of squares sewn on to one large piece of gray elephant fabric - that would be Applique, not Quilting. The elephant fabric will be cut into little rectangles that will fit between all the colored squares. It'll look way better this way, though it's much more work. There will be 5 loooong rectangles to fit between the 4 columns of squares and 24 mini rectangles to fill in the rest of the spaces.


2. Fabric Decisions. The background fabric is the least distracting, so the colored squares stand out. I toyed with some other fabrics before deciding on these three. Others were rejected on the basis of being too dark or light, or for having too large a print. These three have a saturated medium tone color, having similarly stylized blocky prints with white worked into the design.

3. Cutting. My first use of the fabric cutting wheel. Like a pizza cutter. Much easier on carpel tunnel hands than scissors, and way faster. I also used a fabric pencil (draws easily and washes out on fabric), and measured out squares while incorporating space for seams. My squares are 4'x4', thus I cut out 5'x5' squares, assuming a consistent seam of 1/2'. Use large cutting board and long ruler.

4. This awesome tool: the Bias Tape Maker! I've not used it yet, but I'm really excited about it. Bias (fabric) Tape is not sticky like tape, but is a long strip of folded fabric to sew along fabric edges to prevent fraying. Like on blanket edges. This tool folds fabric strips, and you iron the folds down as the fabric emerges from the end. If you've ever tried to make bias tape by hand, you'll appreciate this little gadget! Oh, why "bias"? Supposedly you use fabric cut on the bias (ie, diagonal to grain) - better integrity or something. At this stage, I'm happy to use unbiased fabric strips to make tape. I am looking forward to putting such tape along the edge of my blanket, but that will be the last step.

Top of the Day to You!


Knit hats on babies! You already know how fond I am of the combination. And wrapped (vignetted!) in a textured blanket... yes, all the signature details...

I read an article on the NYTimes today, called The Digital Lives of Babies, by Lee Siegel.
"A recent study published by AVG, an Internet security company, found that 92 percent of American children have an online presence by the time they are 2. One third of mothers in the United States said that they had posted pictures of their newborns online, and 34 percent of American mothers had posted sonograms of their babies in the womb. According to the AVG study, American mothers are more likely to post pictures of their children online than mothers in any other country."

The article is of course interesting to me, as I would guess that a high percentage of baby photos I take for clients are posted on personal online albums. I'm basing my guess on the mass majority portion of parents who are fine with my using their pics on my website or blog; the few who prefer that I not, I assume, do not post pics of their babies/ kids online in general. Oh, an observation - within that small group, parents of girls are more likely to prefer that I not, than parents of boys. Hmm.

Well, how does all this relate to me? Obviously, the babies are an integral part of their parents' identities. Thus, of course babies are featured prominently on parents' Facebook profiles and such. The expectation of (and ease for) friends and family to see online baby photos may be an indirect reason as to why parents want (to show off) better than average baby pics and therefore hire pro photographers and/or invest in DSLRs. Wasn't there a period, say in the 1990s to early 2000s, when we were all happy with point and shoots? I may have Facebook to thank for providing an accessible medium for people to demand and share life documenting photos. What Facebook member with a baby has never received a wall post from a friend saying something along the lines of We want more baby pics!?

The other, more philosophical aspect of the article that I will leave you with:
"The AVG study refers to the first appearance of children on the Internet as their “digital birth.” That seems apt. From that point on, these children will have two lives: one presumably lived consciously and deliberately; and the other, digitized life, subject to countless unknown pairs of eyes, as well as to countless unknown uses and purposes. And this raises the question of free choice. Unlike adults who post pictures of themselves on social networking sites, these babies and children have their images broadcast around the world not against their will, per se, but before they have any will to speak of at all."

To DSLR or Not? Consider these things.


I taught my third DSLR workshop over the weekend. I've come to a point where I can teach pretty much without my notes - the slides: all pictures, are enough of a reminder of what I want to say. I used to wonder how university professors taught without notes, when I needed so many note cards and practice runs to do a presentation. Well, being extremely familiar with a topic and having taught it enough times to figure out how to organize and explain the info - I understand!

Anyways, I've recently encountered more than a few friends who are having the agonizing internal debate: Should I buy a DSLR camera? Even the intro level DSLRs are quite an investment, causing much hemming and hawing.  I thought I'd put together a list of things to consider to help with the decision process.

1. Seeing meh quality point and shoot camera pictures makes you kind of gag a little. (Or conversely, seeing nice pics taken by dslrs makes you think: oooh!) This means that you have some discerning taste concerning photo aesthetics. Some people aren't picky, and are happy with mediocre pics. A DSLR produces much better quality pics, provided you know how to use it. Ok, even on auto mode you'll get better quality pics than most point and shoots.

2. The techie/ geek in you is not intimidated, but rather intrigued, by this bit of machinery with lots of buttons and numbers. If you feel empowered by understanding and mastering digital equipment and like to tinker around with electronic stuff - a DSLR will bring much more satisfaction than a point and shoot. However, if having a big camera will make you take pics less often because all those buttons and numbers are scary - maybe DSLR is not for you. Having a DSLR should encourage More photo-taking.

3. Fancy having artistic control? Maybe there's a bit of artist in you looking for an outlet. Photography is a relatively easy medium to allow tappage into that artistic well. The options on a DSLR (lenses, settings, etc) allows for far deeper tapping than a point and shoot.

4. DSLR ENVY: Inexplicable strong desire for DSLR camera kicks in when you see someone else wit a DSLR camera. There's no rational reason, you just want to have one, and obsessively picture yourself with such weighty equipment hanging from your neck. Nothing else can fill that void in your life. This is rarely the sole reason, but counts as a reason.

All these things apply to me, which is why I thought of them. I do still use a point in shoot for the following instances: (1) traveling in poor neighborhood where it is tacky to pull out a $$ DSLR, (2) spontaneous candid pics where quality doesn't matter so much as atmosphere, e.g. documenting dog making faces due to biscuit stuck in cheek flap.

There are some cameras that are some place between point and shoot and dslr, but I don't know anything about them. There might be a happy medium.

Keep It Simple


Here are some very simple baby pics. Window light, plain wall, reflector to the left for fill light. Simplifying background/ surroundings has got to be the easiest way to vastly improve an indoor photo without knowing anything about your camera or light. It just takes a moment to move the kleenex box, or change angle slightly to crop out the wall socket. Let there be no distractions from baby cuteness!

I'm not sure how five days passed without a post. Well actually I do. I'm experiencing a bit of carpel tunnel, so I'm trying to keep computer stuff to a minimum. I am finding that doing smaller doses of edits, spread over days, helps.

Wood Animals All In A Row


Last week I was reviewing my teaching notes for my Intro to using your DSLR to photographing baby and kids class. And it occurred to me, I really should incorporate some of this composition and creativity advice into my photography. I think I had somewhat lapsed into getting the shots with compositions that I know clients expect, and stayed within a certain safe "range". And here I am with students, encouraging different angles, experimenting with lighting, creating interesting compositions. So this weekend I set out with a refreshed brain and scrubbed eyeballs, ready to seek out such artistic opportunities.

Better than Summer


If the sun angle is low enough, I like to take a few flare photos for experimentation. The sun hitting the lens directly can cause all sorts of artsy effects, most notably the little colored circles, or in this case - some fun haloing and color aberation.

It was 75F and sunny in San Francisco today, a perfect day to have 2 photo shoots. Plus dog walking twice... I spent most of my daylight hours outside, and I was perfectly delighted. Why be inside watching Super Bowl when there's warm sunshiney weather in February? Summer in SF isn't this nice.

Branchy


I was driving down Embarcadero in Palo Alto, and saw this sculpture on the side of the road. I recalled seeing it on the local news. It's a Patrick Dougherty "Site Specific Installation", made entirely out of willow sapplings and creosote, the latter of which I assume was used to stick it all together. There are a number of doorways and windows; one can duck in and out of the creation. Fantastic place for a game of tag. The twigs have a very organic movement; flowing like long dog fur.


Warning: You May Experience Fabric Envy


It's true. I have a cute fabric addiction. I think some of you will understand. A part of the problem is that many cotton prints are limited editions, and so when I see something I like, I just Have To get it or I may never see it again. I don't go crazy though. At most I'll buy a yard. The biggest thing I'll make is a baby quilt, and the great thing about quilts is that one can use even very small pieces. I might make simple bags or cushion covers. I'm not about to make any clothing for myself - way too much of a pain- much easier to go clothes shopping.

My favorite SF fabric store is called Peapod Fabrics in Inner Sunset: http://www.peapodfabrics.com/
I also shop from a few online places:
Fabric Worm (Paso Robles) : http://www.fabricworm.com/
Hart's Fabric (Santa Cruz): http://www.hartsfabric.com/
And occasionally gems may be found at Fabric.com, intermixed with a lot of tacky stuff (their clientele includes the Pre-DIY/Craft-As-Empowerment Generation, if you know what I mean): http://www.fabric.com/

If you are not a Fabric Person (Don't know if you are? Answer this: Do you swoon when overhearing anything about Japanese Import Fabric? If so, you are a Fabric Person), you may be interested to know that sets of fabric designs are designed by fabric designers, like a line of clothing. Sure there are generics, like Jo-Ann Fabric fabrics, but the really cool stuff comes from specific brand names/ designers such as Alexander Henry who came up with the "June Bug" bird line which includes the "June Song" fabric in "Tea" near the top left. Of course the hope is that you'll snap up yards of the whole "June Bug" line, which will be similar in theme/ style and will color coordinate, perfect for your quilting needs.

Neutral Palette


I've been enjoying a neutral photo palette recently. I notice that my recommendations regarding What To Wear changes seasonally. Right now I like pale neutrals, with maybe a pop of spring color. Last summer, I was recommending jewel and garden tones. Fall - browns, creams, denim. Winter - festive red and classic colors like navy and white. Overall, it is fun to photograph saturated colors, but I think that subtle colors are best for showing off baby cuteness.

FYI, background is a bed with white linens. I photoshopped out the pillow creases/ edges in the background. Window light from the immediate right, umbrella electric continuous fill light from the left.

Conjuring Light (sometimes, Reality Bites)

So this is a bit ironic. After teaching a class on how to find great light, I find myself having to shoot in non-ideal light conditions - near sunset and in long strips of shade cast by buildings, fog creeping in and severely diluting warm late afternoon light. A flash would've helped, but I didn't want to use flash on a 7 week baby close-up, even if his eyes were closed. I could've tried some white balance tricks, but it was getting cold, and he'd finally stopped fussing and gone to sleep ... didn't want us all to have to stand around more than necessary. Blue shade plus blue blanket resulted in a very blue picture - so I put my faith in photoshop rescue skills. You can see my embarrassingly blue picture at the bottom left.
Please don't dwell on it for long. 

I tweaked the colors using curves in Lab Color Mode, which I've mentioned in a prior post. Warmed up the entire pic, lightened the face, to further separate from the blue blanket, and added a wash of pale pink over the face. It is still a cool picture, but way better than the original. I just wanted to let you in on a bit of my reality. The ideal natural light doesn't always exist within the hour that I spend with a family, and sometimes I have to conjure it up.

Sharing the Art of Baby Photography


I am very fond of this set of newbie photos. A combination of great natural light from San Francisco style bay windows and a very cooperative, beautiful baby boy. I added some supplemental light using a reflector - I have a fancy reflector, but you can easily use a sheet of white card or foam board, card board covered in foil - placed to the side of the baby (right, left left respectively) so that the window light reflected back and filled in some of the shadow. I don't like to use flash on the very little ones, so given enough window light, this method works well in the place of flash. These pics also show the use of parent hands in newbie pics, the lovely backgrounds that textured white blankets make, and the vignetting potential of blankets.

If you happen to be looking for Japanese Birth or Wedding Announcements, check out my client's fledgling card design business:

I taught my first Natural Light Photography of Babies and Kids with your DSLR workshop this morning, with 3 students (moms). I'd spent the past week putting it together - first a detailed draft of what I wanted to cover, then compiled photos to illustrate my points, next made a streamlined, condensed set of teaching notes to correlate with slides, and finally a student hand out with the most important points. It reminded me very much of putting together a grad school presentation, and I was glad to have that experience (though at the time of MFA, I grumbled and stressed out about having to do so many). And it was nice to have such an attentive, interested and sanitary audience, unlike the jaded, slack-jawed art undergrads or roly poly, leaky-nosed 5 year olds - from my live bug teaching days.

The class is pretty specific. "Natural Light" does not include artificial/studio light, in which I dabble but do not consider myself an expert. "Babies and Kids" are different subjects from adults, and completely different from sport, wildlife, landscape, architectural, product, food and fashion etc photography, in none of which I have expertise either. It's not an unusual assumption by random people (like my clinic's phlebotomist) that I should (a) take interest in and (b) know how to do all those other types of photography.

Anyways, I realized, in the area of Natural Light Baby /Kid Photography I know quite a lot! And felt very comfortable in sharing my experience and accumulated information. There is some demand for a web version, as I have many friends with babies and DSLRs Not In San Francisco. We'll see about that.